|
Hey folks, this is my F-15E Strike Eagle Revell
kit built OOB except for the weapons. It's the second Strike Eagle that I
have built. The first one, a Academy Iraqi Freedom F-15, is now in flight position hanging in my
bedroom. I always loved that jet, but I ruined the Academy kit. I had to remove the paint because the decals silvered like
hell. Because of that all the detail of the structure was gone.
That's why I wanted to build the Strike Eagle again.
But back to the kit. When I opened the box, I was stunned about the level of detail Revell put in the
structure. Really nice. I was a little disappointed cause there were only Sidewinders in the
box. The Academy kit provided me with enough payload for 3 jets. But
that's okay cause my spares box is full of old bombs etc.
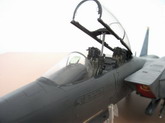
The first thing I built was the cockpit. And again I was surprised about the details, when I looked at reference pictures of the real cockpit there is almost every button, lever etc.
in the right position.
Click on
images below to see larger images
I had some photoetched seatbelts from the
Academy kit which I put in the Revell cockpit. I also shortened the mounting of the front seat cause it came up a little too
high. I painted the cockpit with Revell enamel colors and weathered it with the
Tamiya weathering master. I didn't use the decals from the
kit. Instead I painted the instruments by hand with the smallest brush I could find and a
toothpick. I painted the HUD with thinned clear green mixed with high gloss clear
coat. I also added the photo-etched parts from the Academy kit to the front of the canopy, as you can see in the pictures.
Next were the front fuselage section and the front wheel bay. The wheel bay and gear were painted with
Revell flat white with some silver for the hydraulic hoses, and then
weathered. You can see on my pictures that the fit of the front fuselage was not very
good. I had to sand and fill and sand and fill to make the halves of the nose section fit
together. The same was on the front and main fuselage, also on the wings and the rear
fuselage. Just look at the pictures. The rest of the kit went together very
well. No tricky spots like in the Academy kit.
The GBU-12 LGB came from the Revell Rafale B
kit. I painted them with Revell olive drab with some grey and green mixed together and
weathered it with the a little darker and lighter colors and the Tamiya
master. The decals for the bombs came from my spares box. The JDAM Bunker Buster is from the
Academy F-15E, also the AIM-9X and the AIM-120C. The LANTIRN pod came from the Hasegawa
weapons set C because the one provided with the kit was not really detailed and also really
small. I put on a photo-etched part that came with the Academy kit.
The featherless burner cans from the Revell kit are absolutely wonderful.
I painted them with the Model Master burned iron metalizer and polished the ring behind the burner
cans. The rest of the engine section was painted with the Model Master aluminium
metalizer. Inside of the exhaust cans were painted with flat white and
weathered with black and brown drybrushing.
The rest of the jet was painted with Revell Flat Gunship gray which I mixed with some light
gray. The nose was painted with the same color, mixed with a light
gray. When I built the Academy kit, I realized that the Revell gunship gray went
on very dark, almost black when the clear coat is on. That's why I mixed
it. After two times painting the gray, and some weathering with little darker and lighter mixed gray,
a coat of satin matt clearcoat came on. I then washed the jet with acrylic color, about 30% Burnt sienna and 70% lamp
black. The next clear coat was applied after only one day. Then the
decals were applied. I used the decals from the kit cause they are really
good. After painting the details with a brush the final two coats of satin matt clear coat were
applied. I mixed the two final coats with Gunship gray to bring out the
weathering a little bit. Also the decals came out a little "dirty" after
that. Also after the final coat the jet had the right color.
I gotta' say that I am really satisfied with the results of my work. I hope you like
it! Please give me a little feedback what you think.
Until next time
Philipp
Click on
images below to see larger images
|
|